IMPORTANT:
ALWAYS POWER OFF YOUR DTG G4 PRINTER BEFORE CHANGING THE PRINT HEAD CARRIAGE, BOARDS OR MAINTENANCE UNIT.
Frequently Asked Questions
Upgrading Firmware Chip on G4 Platen
DTG G4 | Ink Tubing Replacement
DTG G4 | Changing SCB
DTG G4 | Adjusting Platen Height
DTG G4 | Leveling Platens + Adjusting Height
G4 | Replacing the Carriage Unit
DTG G4 | Changing the Encoder Strip
G4 | Lubricating Z-Lift Assembly
DTG G4 | Advanced Head Cleaning
DTG G4 | Changing the Vacuum Platen Board
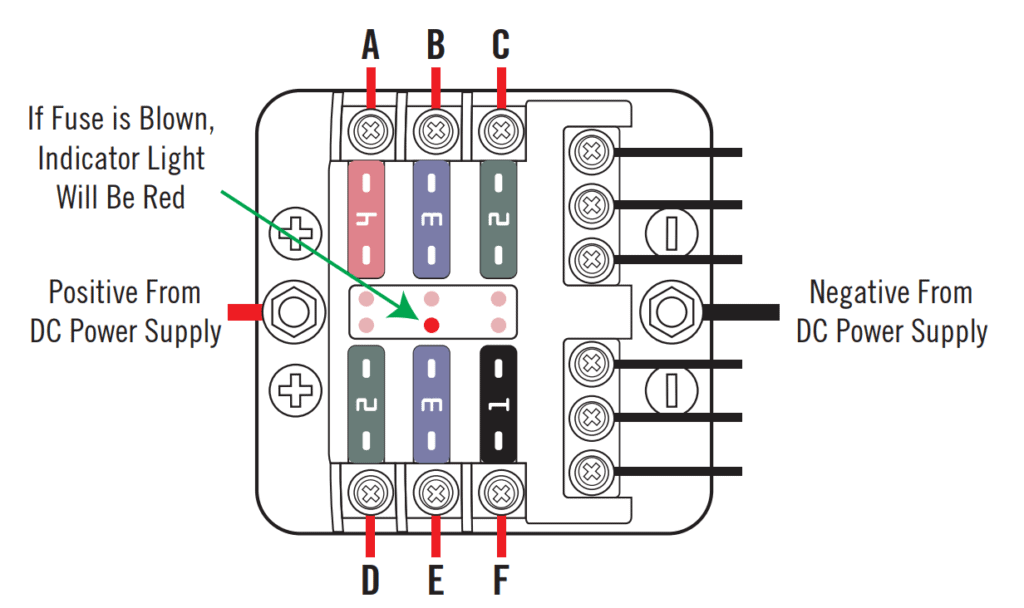
DTG G4 | Fuse Box
If any of the following components are not functioning, always check the blade fuse box (located under the hood in the back left corner of the printer) for a solid red light. This indicates a blown blade fuse.
A – Vacuum Platen – 4 Amp
If there is no power coming to the Vacuum Platen Indicator Lights or Fans
B – Servo Drive – 3 Amp
If the platen will not move in or out of the G4 by either the screen or green button
C – Top Cover LED – 2 Amp
If there is no light on the inside of the hood but the light button has been pressed
D – Ink Mist Extraction – 2 Amp
If the ink mist extraction fans are not on when the heads are printing
E – SCB – 3 Amp
If the G4 screen is black and will not power on by pressing and holding the button
F – Green Load Button LED – 1 Amp
If the green load button is not glowing green
Replacing Air Lever Sensor and Solenoid
DTG G4 | Replacing Feeler Sensor Board
DTG G4 | Replacing the Ink Cartridge Bay
G4 – Ink Cartridge Bay Replacement from ColDesi Support on Vimeo.
Please ONLY do this under the direction of ColDesi Support!
DTG G4 | Updating Firmware and Extracting Log Files
DTG G4 | Maintenance Unit Not Functioning
DTG G4 | Ink Cartridge Chip Replacement
DTG G4 | Accessing the Display Panel
DTG G4 | Fixing Shaking Platen
DTG G4 | Changing the CTL Board
Changing Z-Lift DC Motor
Part 1
Part 2
Part 3

